4 Responses so far.
Leave a Comment
In the past decade, “Virtualization” has been a major movement in the Information Technology world. Every corporate IT department wanted to consolidate their Information Technology resources. Virtualization helped them meet this goal and make use of computing resources more efficiently ever possible. The role of virtualization is very simple when taking a bird’s eye view. The main goal being Hardware Consolidation. One single server can host and run multiple Operating Systems as “Virtual Machines” commissioned to do different functions. There came no need to buy separate hardware for each functions, say one server for email, one for file storage, one for web hosting etc. All the IT department has to do is span a Virtual Machine for running a new server.
With virtualization, corporates were able to do with just 10 physical hardware servers what they could do with 100 in the past. Computing resources are wasted when separate hardware is used to perform each functions. When the email server is not serving any emails, its processor, memory and hard drives are still consuming electricity and computing cycles are wasted doing nothing. Computing resources are more efficiently used when virtualized thus saving energy, space and the environment. Another major advantage of virtualizing is instant scalability.
From the bird’s eye view, all looks simple. But when the intricacies of virtualization are narrowed down, it looks more complex than ever. The selection of the virtualization platform (also called hypervisors), implementation and management are a huge overhead when considering a one-hardware-for-each-server environment of the past.
“Virtualization is also the basis for the modern-day Cloud Computing. The Cloud consolidates the computing resources of the world, what Virtualization did for the corporate IT departments”
Leave the corporate alone, their gains with virtualization is thousand fold in reducing costs of hardware, electricity and space. Why not virtualize and consolidate the computing resources of the home? This move is what I exactly made 2 years back. It wasn’t easy at the beginning but the outcome is terrific.
My goal of virtualizing the home, is to consolidate all the computing functions to one single server hardware. Below is the hardware I’ve been using to do this.
Intel Xeon X3430 Quad Core Processor
8 GB 1333 MHz ECC Unbuffered RAM
3 HDD – 250 GB WD Black + 1.5TB Seagate Barracuda + 3TB Toshiba
On-board Broadcom NIC + Add-on PCIe Intel Gigabit NIC
The PowerEdge server was an excellent machine for virtualization. It was $300 during the end of its life 🙂 (later, the upgrade from 2GB to 8GB RAM alone costed almost half the cost of the server 🙁 , server grade memory is expensive). My chosen virtualization platform was VMWare ESXi. For one reason, its hardware is fully supported by ESXi and Dell provides its own ESXi distribution specific for these servers. The only other contender when I started was Xen Server. Both free and the other hypervisors like Microsoft’s HyperV was not in the big scenes then. Below are the VMs and functions it performs:
Router – Wonder why I have two network interfaces on the server? Yes, my router is virtualized. No more frequent disconnects and resets with off the shelf routers. I have been running PfSense (Link to how to virtualize PfSense here) as the routing software for the past 2 years without a single incident or a slight hiccup. It is an open source routing/firewall software based on FreeBSD and provides features that of a top shelf Cisco router for no cost.
Web Server – My web server runs on Apache on a Linux VM.
File and Backup / Media Server / Personal Cloud – I run Windows Home Server 2011 for file shares, backup and media server. My Videos, Pictures, Music and TV recordings are archived directly to this server. This server also backups my Windows PCs. WHS 2011 provides a convenient web interface to get access to any of my media and files while away from the home network. This also runs a PLEX and Tonido server. My personal cloud, resolved.
TimeMachine Backup – For backing up Mac, I use a FreeNAS VM and AFS share for TimeMachine backups. It is little complicated to setup a TimeMachine backup on a windows file share (perfectly doable with sparse bundles, but not clean). So a separate VM for Mac backups. Later it was migrated to Nas4Free. For one reason, FreeNAS is a memory hog. The suggested memory is 6 GB minimum. Nas4Free even runs beautifully with 1 GB of memory. But the drawback is Nas4Free does not have an elegant web interface as FreeNAS.
Isn’t this The Ultimate Virtualized Home? For the past 2 years or more this setup has run perfectly. The PowerEdge server is now more than 3 years old. It had one drawback though. The BIOS from Dell on these servers does not support VT-d (a method to pass-thru PCI I/O devices and dedicate it to a VM) even though the chipset and Xeon X3430 processor supports it. My initial idea is to pass-thru a video card and usb controller (for mouse, keyboard and IR receiver for remote) to a VM so it becomes a desktop serving as my HTPC (Home Theater PC) doing all the video playback and TV recording functions. But no luck with the PowerEdge. And also its hardware is getting older for today’s standards with slower SATA 2 (not SATA 3) ports that would restrict the read/write speeds of SSDs to half.
With all the restrictions of the PowerEdge T110, it was time to upgrade and enters a new server to replace it. Hardware specifications are below:
Intel Xeon E3-1225v3 Quad Core Processor
12 GB 1600 MHz ECC Unbuffered RAM
1 SSD – Intel 530 240GB SSD
4 HDD – 1.5TB Seagate Barracuda + 2 x 3TB Seagate Barracuda + 3TB Toshiba
1 On-board Intel NIC + Add-On Intel Gigabit NIC
The ThinkServer was completely migrated to TS140. The TS140 supports VT-d in the BIOS. Lot more functions have been added with the addition of extra hard drives and a SSD.
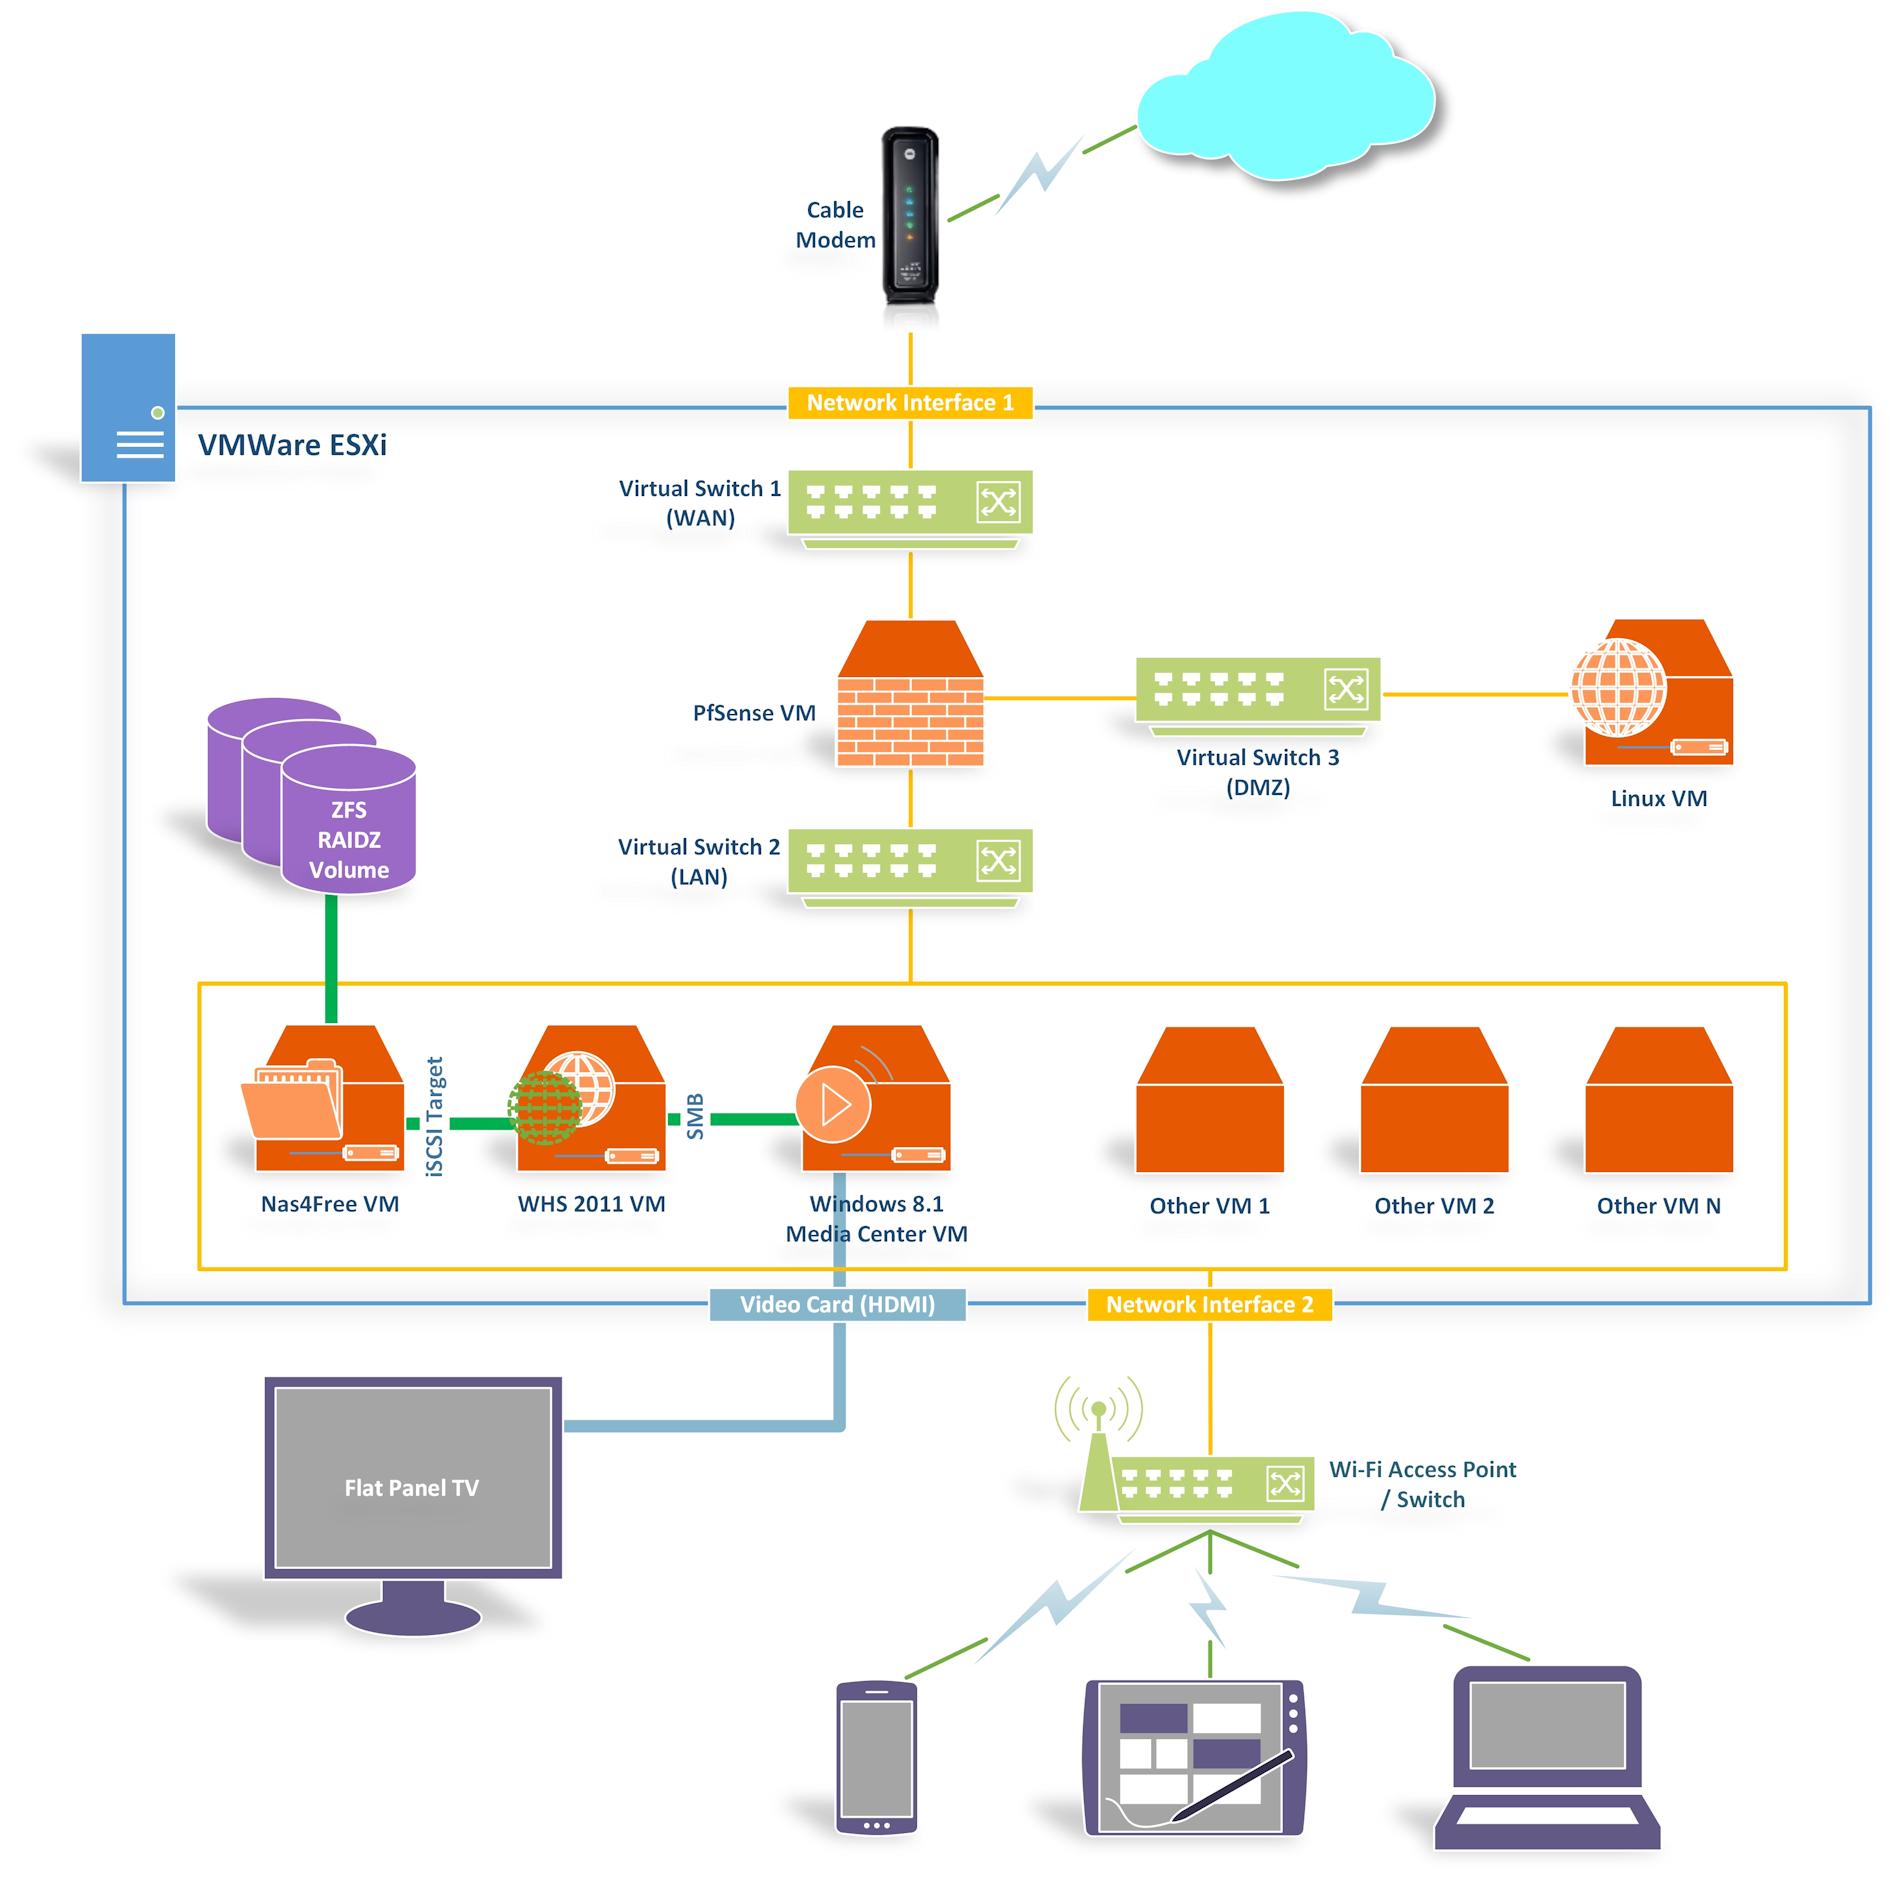
The Virtualized Home
In the coming days and in this section, I will share more about my specific setup (as described in the diagram above) and the experiences I had in doing so. And of course when we talk about taking a closer look, all the challenges, difficulties and problems I’ve encountered. Ciao 😉 .
I am very much interested in your setup. I just recently purchased the TS140 and would like to implement a virtualized Home solution very similar to what you have done. Please contact me directly so I can learn more about your setup especially all the hardware and software purchased as well as setup challenges.
I recently purchased a TS140 hoping to setup a home cloud using ESXi 5.5. But I’ve been running into issues with the on board NIC and RAID controller. You seem to have achieved what I’m dreaming about. How did you get around these issues? I tired customizing the ESXi distro with the customizer utility without success.
-Abhi
-Abhi